
The Wireless Protocol Suite is used to view all frame related information. It is composed of several different sections or "views" where each pane shows a different type of information about a frame. A brief description of each pane or view is given here with a more detailed explanation later in the User Manual.
Summary Pane - Displays a one-line summary of each frame for every protocol found in the data and can be sorted by field for every protocol.
Message Sequence Chart - Displays information about the messages passed between protocol layers.
MSC displays a concise overview of a Bluetooth connection, highlighting the essential elements for the connection. At a glance, you can see the flow of the data including role switches, connection requests, and errors. You can look at all the packets in the capture, or filter by protocol or profile. The MSC is color coded for a clear and easy view of your data.
Decode Pane - Displays a detailed decode of the highlighted frame. Fields selected in the Decode Pane have the appropriate bit(s) or byte(s) selected in the Raw Data Pane.
Raw Data Pane- Displays the logical data bytes in the selected frame in either hexadecimal, decimal, binary or ASCII.
Throughput View - Displays Packet Payload Throughput.
Timeline View - Displays packet information with an emphasis on temporal information and payload throughput. The timelines also provide selected information from Summary Pane.
Coexistence View - Displays Classic Bluetooth and Bluetooth Low Energy packets and throughput in one view.
Packet Error Rate View - Displays a graph for each Classic Bluetooth channel numbered 0 through 78 and for each Bluetooth Low Energy channel numbered 0 through 39.
Working with Panes on the Main windows
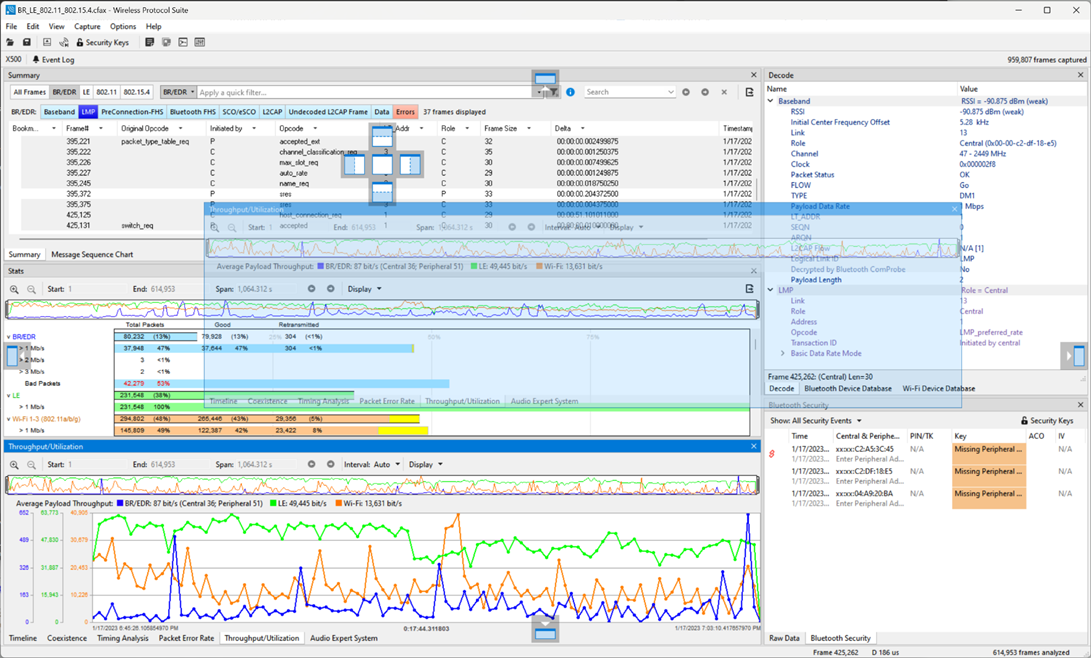
When the Main window first opens, all panes are displayed.
-
Allows docking panes in an undocked pane.
-
Indicates which pane is in focus with color coding.
-
Allows any number of splits horizontally and vertically.
-
Allows changing the width and height of the panes.
-
Allows docking panes by grabbing the top or bottom of a pane. Packet Error Rate, Timeline and Coexistence (CoEx) panels allow users to change the order of nested tabs: BR/EDR and LE for Timeline and PER panels/ 2.4 and 5 GHz for CoEx panel. The orders save between sessions.
To get back to the original default set of panes, just select View > Reset Window Layout.
Device Database View - Displays Active/Previous/User added wireless devices. It also allows you to add/edit/delete wireless devices, set devices properties and configure check/uncheck devices for analysis.
Summary
The Summary pane displays a one-line summary of every frame in a capture buffer or file, including frame number, timestamp, length and basic protocol information.
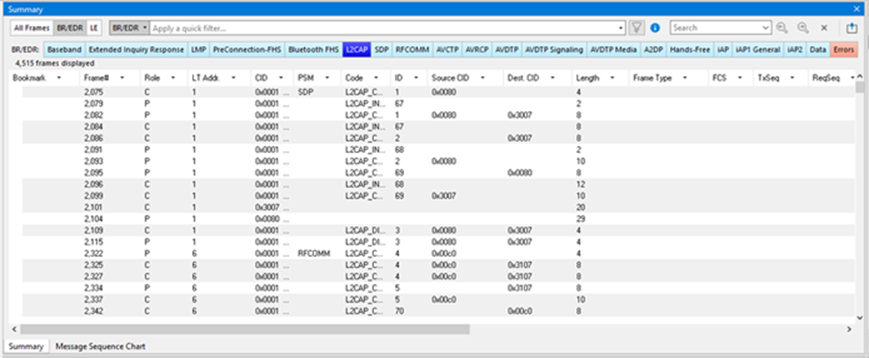
The protocol information included for each frame depends on the protocol selected in the summary layer box (located directly below the main toolbar).
On a two-channel circuit, the background color of the one-line summary indicates whether the frame came from the DTE or the DCE device. Frames with a white background come from the DTE device, frames with a gray background come from the DCE device.
The Wireless Protocol Suite USB Summary pane displays a one-line summary of every transaction in a capture buffer or file. Whenever there is a transaction, it is shown on a single line instead of showing the separate messages that comprise the transaction. The Msg column in that case says “Transaction”.
Each message in a transaction contains a packet identifier (PID). All the PIDs in a transaction are shown in the transaction line.
All "IN" transactions (i.e. transactions that contain an IN token message) are shown with a purple background. All other transactions and all non-transactions are shown with a white background. "IN" transactions have special coloring because that is the only place where the primary data flow is from a device to the Host.
The protocol information included for each frame depends on the protocol selected in the summary layer box (located directly below the main toolbar).
Frame numbers in red indicate errors, either physical (byte-level) or frame errors. If the error is a frame error in the displayed protocol layer, the bytes where the error occurred are displayed in red. The Decode Pane gives precise information as to the type of error and where it occurred.
The Summary pane is synchronized with the other panes in this window. Click on a frame in the Summary pane and the bytes for that frame is highlighted in the Event pane while the Decode pane displays the full decode for that frame. Any other panes being viewed are updated accordingly. If you use one pane to select a subset of the frame, then only that subset of the frame is highlighted in the other panes.
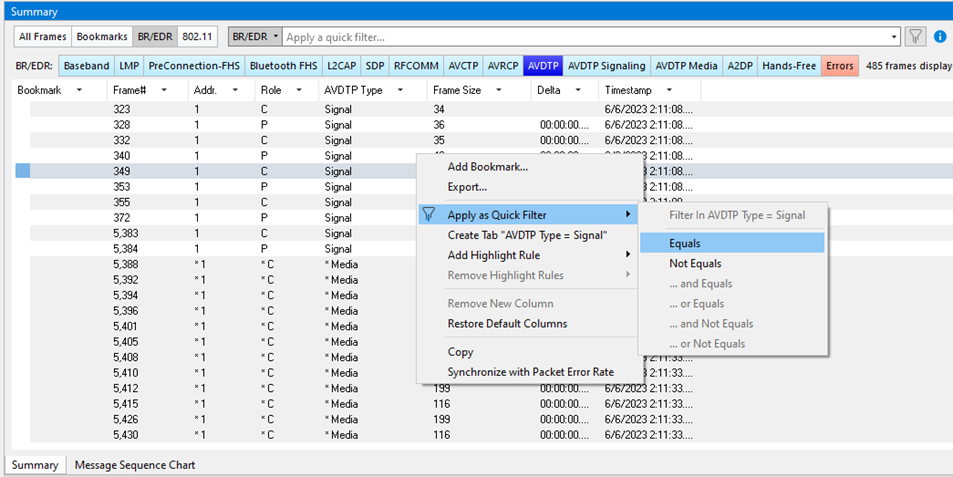
Various functions are available from the Summary context menu.
-
Add Bookmark: Adds a bookmark. See section 6.4 for more details on bookmarks.
-
Export: Opens the Export dialog to export Summary data to text. See section 7.8 for more details on export.
-
Apply as Quick Filter: Allows to quickly build a query for query-based filter using selected field and its value. The new query will be added to the filter input and executed. See section 5.8 for more details on query-based filtering. There are several predefined options to build the query:
Equals – creates a query to filter in all frames where the field value equals to the selected filed value. The query will replace current query in the filter input (see section 5.8).
Not Equal - creates a query to filter in all frames where the field value does not equal to the selected filed value. The query will replace current query in the filter input (see section 5.8).
…And Equals – combines the ‘Equals’ query with the existing query in the filter input using AND logical operator.
…Or Equals – combines the ‘Equals’ query with the existing query in the filter input using OR logical operator.
…And Not Equals – combines the ‘Not Equal’ query with the existing query in the filter input using AND logical operator.
…Or Not Equals – combines the ‘Not Equal’ query with the existing query in the filter input using OR logical operator.
-
Create Tab: Creates a unique custom tab based on the selected field and value. See section 5.9.1 for more details on Custom Tabs.
-
Add Highlight Rule: Adds a unique frame highlighting based on the selected field and value. See section 5.7.4 for more details on Frame Highlighting.
-
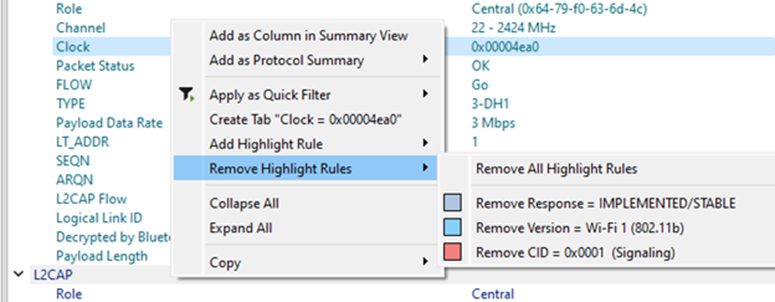
Remove Highlight Rules: Removes the applied frame highlighting. See section 5.7.4 for more details on Frame Highlighting.
-
Remove New Column: Removes column if it was added manually from Decode pane.
-
Restore Default Columns: Restores default set of columns for current Tab.
Protocol Tabs
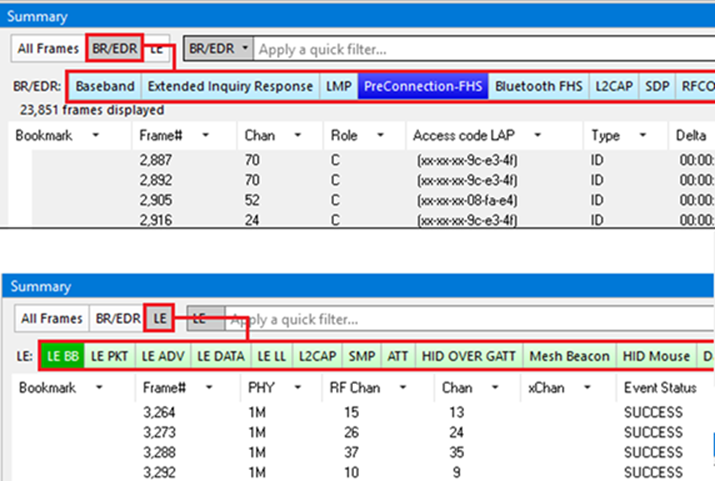
Protocol filter tabs are displayed in the Main windows above the Summary pane.
These tabs are arranged in separate color-coded groups. These groups and their colors are General (white), Classic Bluetooth (blue), Bluetooth Low Energy (green), Wi-Fi (orange) and 802.15.4 (purple). The General group applies to all technologies. The other groups are technology specific.
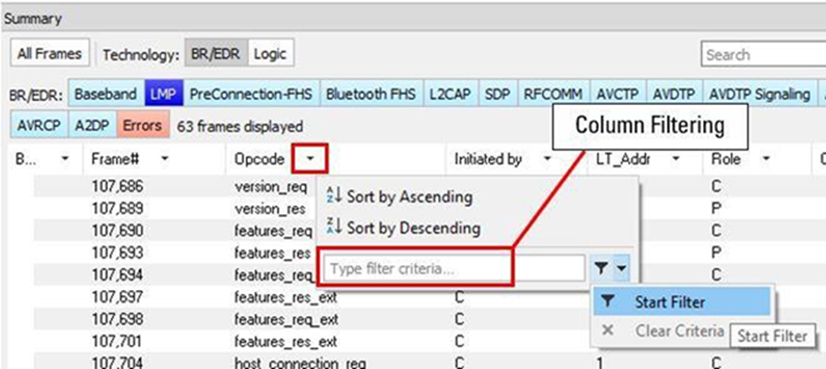
-
Clicking on a protocol filter tab in the General group filters in all packets containing that protocol regardless of each packet’s technology.
-
Clicking on a protocol filter tab in a technology-specific group filters in all packets containing that protocol on that technology.
-
A protocol filter tab appears in the General group only if the protocol occurs in more than one of the technology-specific tab groups. For example, if L2CAP occurs in both Classic Bluetooth and Bluetooth Low Energy, there will be L2CAP tabs in the General group, the Classic Bluetooth group, and the Bluetooth Low Energy group.
Select the All Frames tab to display all packets.
There are several special tabs that appear in the Summary pane when certain conditions are met. These tabs appear only in the General group and apply to all technologies. The tabs are:
-
Bookmarks appear when a bookmark is first seen.
-
Errors appear when an error is first seen. An error is a physical error in a data byte or an error in the protocol decode.
-
Info appears when a frame containing an Information field is first seen.
The tabs disappear when the capture buffer is cleared during live capture or when decoders are reloaded, even if one of the tabs is currently selected. They subsequently reappear as the corresponding events are detected.
Bluetooth Low Energy Data Encryption/Central and Peripheral Assignment
A Bluetooth Low Energy data connection consists of connection events, which are a series of transmissions on the same channel. In each connection event the central transmits first, then the central, and then the devices take turns until the connection event is finished.
When the data connection is encrypted and the packets are successfully decrypted, the sniffer can determine exactly who sent which packet (only non-empty, encrypted packets – empty packets are never encrypted). These packets are labeled either ‘C’ for central or ‘P’ for peripheral.
When the data connection is unencrypted or when encrypted packets are not successfully decrypted by the sniffer, the sniffer cannot distinguish the two devices’ (central and central) packets by their content, just by the packet timing. In those cases, we label each device as side ‘1’ or ‘2’, not as central or central. In each connection event, packets sent by the device which transmitted first in the connection event are labeled ‘1’, and packets sent by the device which transmitted second are labeled ‘2’.
If no packets in the connection event are missed by the sniffer, the device labeled ‘1’ is the central and the device labeled ‘2’ is the central. However, if we do not capture the very first packet in a connection event (i.e. the packet sent by the central) but do capture the packet sent by the central, we label the central as side ‘1’ since it is the first device we heard in the connection event. Because there is potential clock drift since the last connection event, we cannot use the absolute timing to correct this error; there would still be cases where we get it wrong. Therefore, we always assign ‘1’ to the first packet in a connection event. So even though it is rare, there are connection events where packets sent by the central device are labeled ‘1’ and packets sent by the central are labeled ‘2’.
Finally, in a noisy environment, it is also possible that the sniffer does not capture packets in the middle of a connection event. If this occurs and the sniffer cannot determine the side for the remaining packets in that connection event, the side is labeled ‘U’ for “unknown”.
Frame Highlighting
Adding highlighting on the Summary View can help greatly with at-a-glance viewing to emphasize the frames you might be interested in.
Frame highlighting is saved only for the current session and will not be saved to a file.
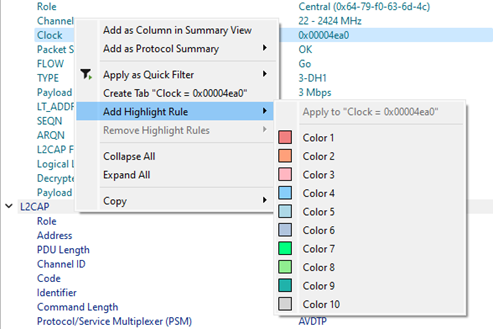
You can create a unique frame highlighting by selecting a data point on the Summary View or Decode View and using the right-click menu.
-
Select a data point in the Summary View or row in the Decode View.
-
Right click in one of the data columns in the Summary View or line in the Decode View.
-
Select Add Highlight Rule and then choose one of the predefined colors.
To remove the applied frame highlighting, select the “Remove Highlight Rules” menu item from the context menu of Summary or Decode Views.
Bluetooth Low Energy Decryption Status
Occasionally you may have a packet with an event status of “received without errors” but a decryption status of “unable to decrypt.” There are three main causes for this and in order of likelihood they are:
-
Wrong Long-Term Key – having the wrong long-term key will cause this error, so the first thing to check is that your long-term key is entered correctly.
-
Dropped Packets – Too much interference with a Frontline device will cause dropped packets and may cause this error. As a rule of thumb, it is always a good idea to ensure the Frontline device is positioned away from sources of interference and is placed in between the two devices being sniffed.
-
Faulty Device – although the chances of this are low, it is possible that a device is not encrypting packets properly. This is likely to happen only if you are a firmware developer working on encryption.
Column Filtering/Sorting
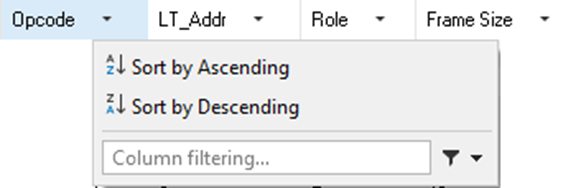
The Column Filter/Sort provides an easy way to sort/filter specific information from the Summary View making it easier to find information. Clicking on a column header provides options to either sort or filter data.
Sorting
By default, frames are sorted in ascending numerical sequence by frame number. Click on “Sort by Ascending” or “Sort by Descending” to sort data in the desired order.
It may take some time to sort large numbers of frames.
Filtering
A value or range of values can be used to filter data. Multiple column filters can be applied to the current protocol tab which are combined using “AND” operation. The column filters for a protocol tab reset when the tab changes or the current tab is re-selected.
To apply a filter:
-
Click on the column header.
-
Type filter criteria into the edit field.
-
Then press “Enter” or click on the filter icon.
To change the current filter, click on the column header again, update the filter criteria, and press “Enter” or click on the filter icon.
To clear a filter:
-
Click on the column header.
-
Click on the Clear icon

To reset a filter, click on a column header. From the drop-down menu, click on the “Clear Criteria” icon or clear edit field, type in the criteria, click on the drop-down arrow and select “Start Filter”.
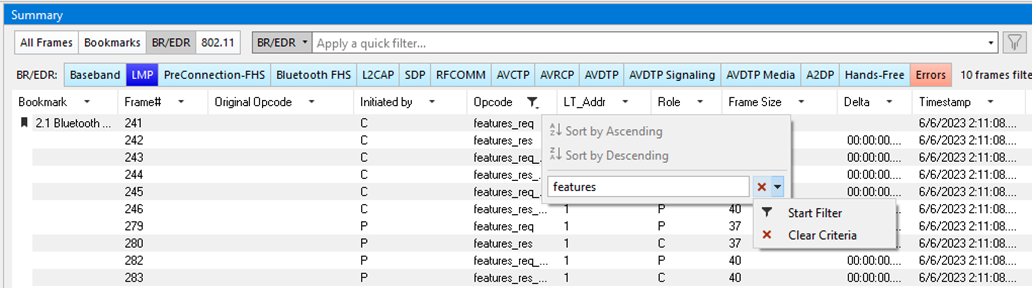
To reset all header filters, click on the current tab or another tab (protocol or technology).
The columns “Frame#” and “Frame size” can be filtered with range, such as value1 – value2. If value1 is skipped, then 0 is used as a low boundary. If value2 is skipped, the max value is used as an upper boundary.
The column filters cannot be used on Bookmark tab or Delta column. The filter on columns such as “Channel”, “Chan”, “Frame#”, “Frame size” use full match criteria for a field value. To filter on columns such as “Timestamp”, “Hardware Clock”, “Src SAP”, “Dest SAP”, “Access code LAP”, “AddrTypeI”, “AddrTypeA”, “Opcode”, “Original Opcode”, “Signal ID”, “Error Code”, “Command”, "Code", apply partial match criteria in any part of corresponding field in frames. Filters for all other columns apply match from the beginning of the field data.