
When the Wireless Protocol Suite software is loaded and started on the host computer, the Wireless Protocol Suite Main Window with Analyzer toolbar(s) will open. It allows users to control and view the status of a connected analyzer from within the main application window of the Wireless Protocol Suite.
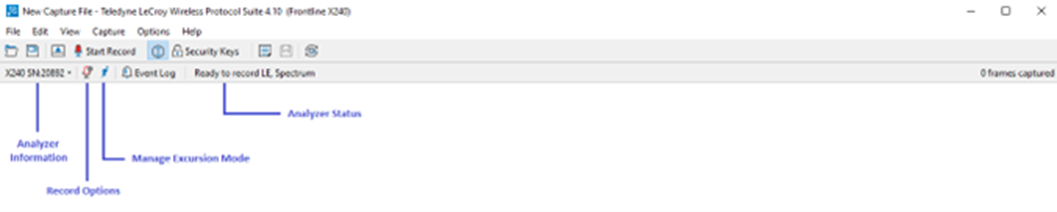
The Analyzer toolbar includes the following:
-
Display of analyzer information
-
Display of the current analyzer status
-
Ability to configure record options
-
Display of wireless devices captured (current and previously captured)
-
Display of captured Security Events
-
Display of event messages
-
Ability to apply feature licenses
-
Ability to manage eExcursion Mode captures
The Analyzer toolbars are presented for each connected Analyzer. For example, for Synchronized X240 mode, two analyzer toolbars appear:

The Analyzer toolbars are presented in live mode and when a capture file is opened. Raw Bluetooth data is required to display the toolbars. When opening a capture file without corresponding .scap file, the Wireless Protocol Suite will not display Analyzer toolbars.
Starting software release 3.00, the raw Bluetooth, Wi-Fi and Spectrum supporting files are included with the capture file. The file is saved with a new .cfax extension.
When opening a capture file, the Record Options, eExcursion Mode Captures menus, and the Analyzer Status indicator will not be displayed.
Analyzer Toolbar Menu and Icons
The Analyzer toolbar menu is fixed in position and always in view. When selected, the Analyzer Information and Analyzer Options create pull-down menus with options for each topic. The Analyzer Toolbar icons and pull-down menu items are described in the table below.
Wireless Protocol Suite Analyzer Toolbar Icons and Menus
|
Icon/Menu |
Description |
|
|
Analyzer Information menu: 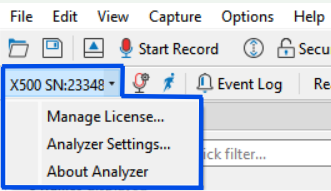
|
Manage License – opens dialog box that allows to view the details of a currently installed license file or update the license file. Analyzer Settings - opens dialog box that allows to view or change current analyzer IP settings. About Analyzer - displays analyzer version and configuration information. |
|

|
Opens the Record Options dialog where the attached hardware can be configured for Bluetooth technologies and other capture modes. For additional information see Record Options. |
|

|
Record or delete captures from the analyzer hardware that were created using eExcursion mode. This opens the Manage eExcursion mode captures dialog. This selection is disabled during live capture. |
|
|
Event Log button 
|
Event Log |
Opens the Event Log view. |
|
|
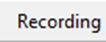
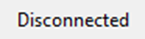
The Analyzer status. The following statuses are available: Ready to record – the Analyzer is connected and ready to record traffic. Recording – the Analyzer is recording traffic. Disconnected – the Analyzer was disconnected from the system. |
|
Autoboot
Autoboot mode is an option that will configure the analyzer to autoboot upon power being applied to the unit. The Power button is not required.
X500(e) Autoboot option is set using the switch on the rear panel.
Pressing the Power button on the analyzer when power is already applied will result in powering-down and then immediately powering back up the analyzer - effectively making the Power button a reset button instead.
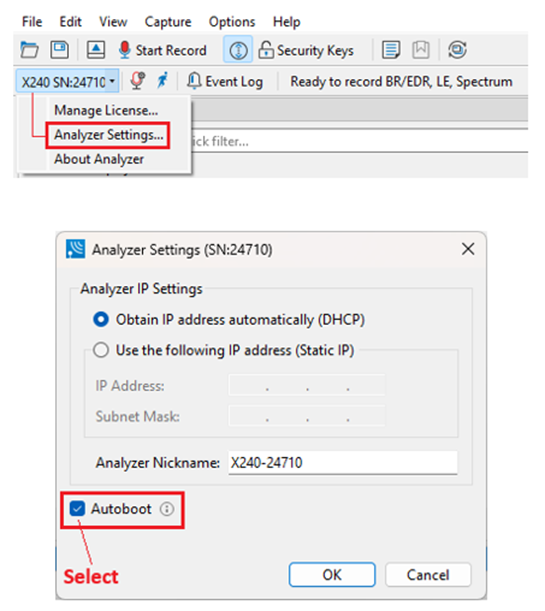
To enable, select Analyzer Settings… in the analyzer’s dropdown menu and check the Autoboot checkbox.
When using external USB power in addition to the host connection, ensure that the external power cable is connected to the X240 unit first. If the power cable is disconnected from the X240 while powered on, the analyzer must be manually powered on. To do this, disconnect both power and host cables. Reconnect the power cable first and then the host cable. Once connected, press the power button for the unit to boot up.
Sometimes, after manually powering on the unit, Wireless Protocol Suite does not recognize the X240 and states the unit is disconnected. If this happens, Wireless Protocol Suite needs to be closed and reopened for the unit to be recognized.
Manage eExcursion Mode Captures Dialog
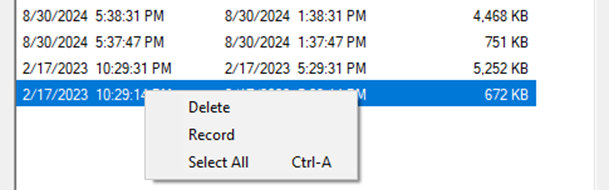
This dialog provides the user with a means to record or delete captures previously created and saved on the hardware using eExcursion Mode.
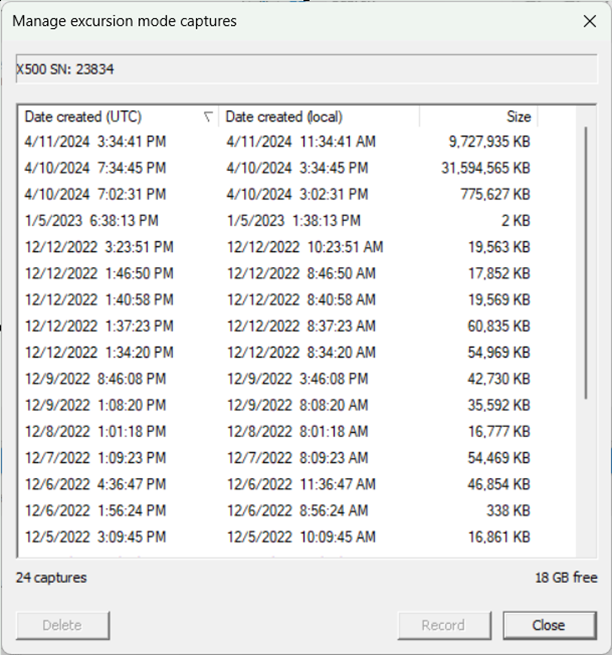
If a hardware unit is connected to the computer, the dialog displays:
-
The serial number of the hardware.
-
A listing of all eExcursion Mode capture files stored on the currently connected analyzer hardware. If no files are stored, the list will be empty.
The listed files display the following information.
-
Date Created (UTC) - the date and time in the UTC time zone that the eExcursion Mode capture was started.
-
Date Created (local) - The capture’s starting date and time in the local time zone of the user's computer.
-
Size - the size of the eExcursion Mode capture.
Select eExcursion Mode capture files by
-
Click to select a single file.
-
Shift-click to select a contiguous range of files starting with the most recently selected file.
-
Ctrl-click to select an additional file or non-contiguous file to the selection.
-
Select all files by:
o right-clicking and selecting Select All Ctrl-A from the context menu, or.
o Typing Ctrl-a.
Delete selected files from the connected analyzer hardware by
-
Pressing the Delete key, or
-
Right-clicking and selecting Delete from the context menu, or
-
Clicking the dialog Delete button.
A delete operation will display a confirming dialog that requires the user to confirm the operation before the files are deleted. Clicking on Yes will permanently delete the files from the connected analyzer hardware.
Clicking on Cancel will abort the delete operation.
Record - Selecting a single file will enable the Record button and the Record right-click pop-up menu item. Clicking the Record button or menu item will close the dialog and start recording the selected eExcursion Mode capture to the user's computer.
Right-click pop-up menu
Right-clicking on any file will open a pop-up menu with options to Delete, Record, or Select All.
LE Direct Test Mode Channel Selection Buttons
|
Button |
Description |
|
Select All |
Selects all 40 Low Energy channels |
|
Clear All |
Deselects all 40 Low Energy channels |
|
OK |
Active once a channel selection is made. When clicked the selected channels are saved for analysis, and the dialog closes. |
|
Cancel |
Closes the dialog without saving any changes. |
Record Options Dialog
The Record Options dialog is used to configure the analyzer unit prior to data capture. The record options are stored on the analyzer hardware and these settings will persist until changed. The Record Options dialog is only active when the analyzer is connected to the computer and running the Wireless Protocol Suite software.
If the analyzer is not connected, these settings cannot be viewed or changed.
Clicking OK will save the Record Options settings. Any Record Options parameter changes made will overwrite the previously saved Record Options.
Wireless Tab
The Wireless tab is scrollable.
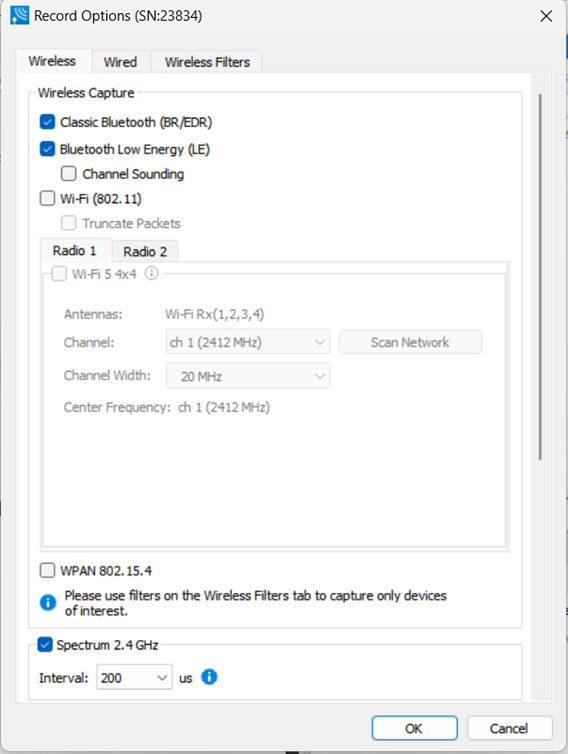
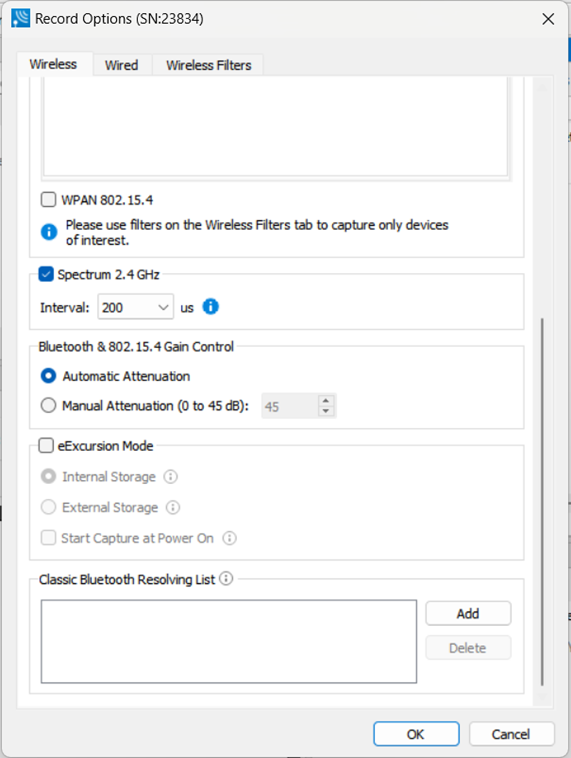
Record Options Wireless Tab Selections
|
Section |
Selection |
Description |
|
Wireless Capture |
Classic Bluetooth |
When checked, will capture data from Classic Bluetooth devices. |
|
Bluetooth Low Energy |
When checked, will capture data from Bluetooth Low Energy devices. The sub menu for Bluetooth LE Channel Sounding (CS) is provided to configure Channel Sounding (CS) data capture. By default, the check box for Channel Sounding is unchecked so no CS packets are captured. |
|
|
Wi-Fi 5 4x4 |
When checked, captures from 802.11a/b/g/n/ac devices. See the section titled Wi-Fi Configuration following this table. |
|
|
Wi-Fi 6E 2x2 |
When checked, captures from 802.11a/b/g/n/ac/ax devices. See the section titled Wi-Fi Configuration following this table. |
|
|
WPAN 802.15.4 |
When checked, will capture data from 802.15.4 devices. |
|
|
Bluetooth Continuous Capture |
|

This enables/disables Continuous Capture which maintains connections between capture sessions while the X500 or X240 remains powered. This means that if a capture is stopped and then restarted while the X500/X240 is powered, all the connections found in earlier capture sessions will be restored in following capture sessions. |
|
Spectrum 2.4 GHz |
|
When checked, this selection provides the user with the ability to capture samples of the 2.4 GHz RF present at the X500/X500e antenna. The Spectrum data represents the RSSI and it is automatically saved when the capture is saved. It can be optionally viewed in the Coexistence View. Spectrum sampling is set at 20, 50, 100, or 200 microsecond intervals using the Interval control. 
Capturing Spectrum data will use additional memory, and the smaller the sample interval, the more memory that is used, so when using sample rates less than 200 microseconds the X500/X500e unit must be connected to a computer and not being used in eExcursion Mode. See Spectrum Analysis and Coexistence View - Spectrum for more information. |
|
Spectrum 5/6 GHz (X700 only) |
|
When checked, the analyzer captures spectrum samples in the 5 GHz and 6 GHz RF. This covers the U-NII-1 through U-NII-5 bands. The spectrum data represents the RSSI values from the antenna and the software saves the spectrum data when the capture is saved. The spectrum can be viewed in the Coexistence 5/6 GHz view. The sampling interval occurs at 200 microsecond intervals. Capturing spectrum 5/6 GHz data will use additional storage space. |
|
Bluetooth & 802.15.4 Gain Control |
Automatic Attenuation |
The analyzer will automatically adjust the attenuation of the received RF signal to estimated levels suitable for effective data capture. |
|
Manual Attenuation |
Manual Attenuation may be necessary if the capture does not provide reliable results. Attenuation can be adjusted from 0 to 45 dB in 1 dB steps. For example, in the presence of a strong Wi-Fi signal the user may have to increase the attenuation to achieve a reliable Bluetooth or 802.15.4 data capture. The user should adjust the attenuation and then capture the data again. Repeat, if necessary, until a reliable data capture is achieved. 
The default Manual Attenuation is 5dB. |
|
|
eExcursion Mode |
|
When eExcursion Mode is checked, the analyzer will support eExcursion Mode captures where the hardware can capture data without being connected to a computer. The configured traffic is captured for later upload and analysis using a computer running the Wireless Protocol Suite software. Refer to eExcursion Mode for more information about the eExcursion Mode. |
|
Classic Bluetooth Resolving List |
|
This is a list of Classic Bluetooth device addresses used to resolve packet source BD_ADDRs (Bluetooth Device ADDResses) during capture. The Analyzer maintains a database of known device BD_ADDRs indexed on the least significant 4 bytes of the BD_ADDR – the UAP and LAP. Over time, the device database will grow and may contain multiple devices with BD_ADDRs with the same UAP and LAP. The resolving list is used to specify a known set of device BD_ADDRs that will be encountered in a capture session. This list will be checked first for matching device BD_ADDRs. Each BD_ADDR on the resolving list must have a unique value for the least significant 4 bytes of the BD_ADDR (UAP and LAP). |