
The Security View is where the Wireless Protocol Suite software identifies devices with captured traffic ( 
Successful decryption of captured data requires receipt of all the critical packets and either:
-
be given the link key by the user, or
-
observe the pairing process and determine the link key.
See Critical Packets and Information for Decryption for a description of the critical packets. The
Security View will identify the type of key required for decryption.
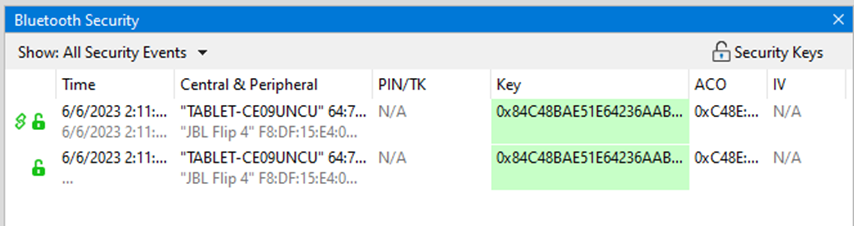
The Security View shows events in the current capture. When the Start Record button is
clicked, all devices with active traffic that require decryption are shown. Security events
appear in starting time order with the most recent event at the bottom.
-
Status: displays icons showing the pairing and encryption/decryption status.
|
Icon |
Description |

|
Pairing/Authentication attempt observed but was unsuccessful. |

|
Devices successfully Paired/Authenticated. |
|

|
Encrypted: traffic is encrypted but there is insufficient information to decrypt. See Critical Packets and Information for Decryption for a description of the critical packets. |

|
Decrypted |
-
Time: Beginning and end time of the security context. No end time is indicated by an "…". Beginning time is shown in the first row of the grouping. End time is shown in the second row.
-
Central and Peripheral: The BD_ADDR of the Central and Peripheral device in the link. If the friendly name is available, it will show on the second line.
-
PIN/TK:
o Classic Bluetooth®:
■ Legacy Pairing PIN: 1 to 16 alphanumeric character PIN
o Bluetooth Low Energy
■ PIN: 6-digit numeric passkey (000000 - 999999)
■ Out-of-Band Temporary Key (OOB TK): 32-digit hexadecimal number
-
Link Key
o Classic Bluetooth®, 32-digit hexadecimal number
o Bluetooth Low Energy, 32-digit hexadecimal number
o The Link Key cell displays "Enter link key" in gray when the link key is unknown. When a link is invalid, the cell has a light red background and indented gray text under the link key says "Invalid". When a link key is valid the cell has a light green background and indented gray text under the link key says "Valid" (if the link key was transformed from the entered link key the text is "Valid (Reordered)".
o If the analyzer is analyzing and a link key has not been entered, "Stop analyzing to enter link key" appears in the device Link Key cell. Click the Stop Analyze button to stop the analysis, and type or paste in the link key.
o Users can enter the device security information by typing directly on the device fields PIN/TK and Link Key. An invalid entry will display a red background and a warning Invalid.
-
ACO: Authenticated Ciphering Offset is used by the devices for generation of the encryption key in Classic Bluetooth.
-
IV: Initialization Vector is displayed for both Bluetooth Low Energy encryption and Classic Bluetooth Secure Connections/AES encryption. The central will use the IV in starting the encrypted communications.
Security View Toolbar
The Security View toolbar appears at the top of the pane. The Security View Toolbar items are described below.
Security View Toolbar
|
Menu |
Description |
|
|
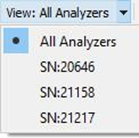
Available in the multiple analyzer mode. All analyzers or analyzer by serial number items can be selected. In case item with analyzer serial number is selected, the security contexts associated with this analyzer will be shown. In case “All Analyzers” item is selected all available security contexts will be shown. |
|
|
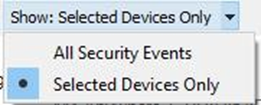
The default state of the tool is “Selected devices only”, shows available security information for selected active devices in the Wireless Devices table. In case the state was changed, the new state will be saved between sessions. When the tool is clicked, that is active, only the available Security View only shows the security context associated with the wireless devices that have been selected for analysis. Should device selection change by selecting or deselecting devices, the Security View display will change with the device context. |
|

|
Security Keys menu can be used for Bluetooth Privacy Code and Bluetooth Private Key windows opening. For multiple analyzers mode submenu with analyzer serial number should be used for appropriate window opening. |
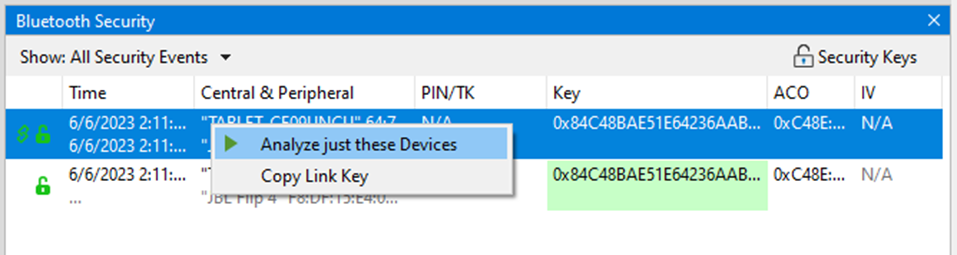
Select Bluetooth devices to filter data in the Summary pane from the Bluetooth Security pane by using the right- click menu item “Analyze just these Devices”. This automatically analyzes traffic between devices of the selected connection.
Classic Bluetooth Encryption and Decryption
To decrypt a Classic Bluetooth link there are two options in the Security pane.
-
PIN: Enter the PIN/TK field; legacy pairing only.
The only time a PIN can be used is when the Analyzer has captured Legacy Pairing in the current trace. The datasource uses information transferred during the Legacy Pairing process to calculate a Link Key.
-
Link Key: Enter the Link Key field.
Passkey/PIN
The first option uses a PIN to generate the Link Key. If the analyzer is given the PIN and has observed complete pairing it can determine the Link Key. Since the analyzer also needs other information exchanged between the two devices, the analyzer must catch the entire Pairing Process or else it cannot generate the Link Key and decode the data.
The PIN/TK can be up to a maximum of 16 alphanumeric ASCII characters or a hexadecimal value that the user enters. When entering a hexadecimal value, it must include a “0x” prefix, for example, “0x1234ABCD”.
Link Key
If you know the Link Key in advance you may enter it directly. To enter the Link Key, click on the device row Link Key field and enter the Link Key in hex followed by the keyboard Enter key. If the link key has previously been entered, it is automatically entered in the edit box after the Central and Peripheral have been selected. Once the Link Key is entered, the ACO automatically appears in the Security pane for the devices in the link.
The Link Key does not have to be prefixed with "0x" because the Link Key field will only accept hex format, and the "0x" prefix is added automatically. Entering "0x..." will result in an invalid entry result.
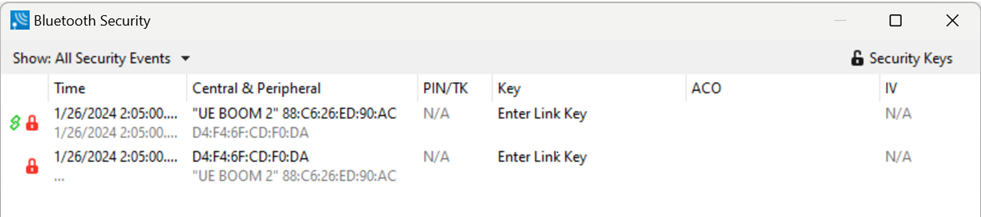
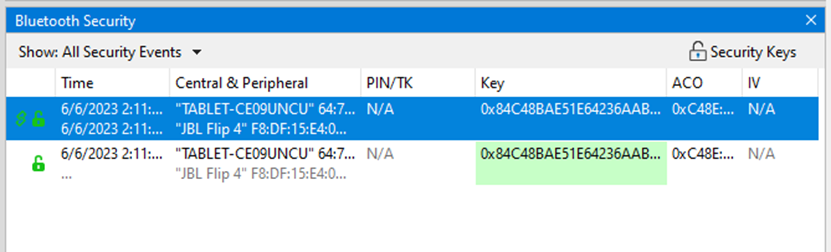
If the Link Key is correct the Link Key field for the devices in the encrypted link will appear green with "valid" below the link key. If the Link Key is not correct the Link Key field will appear red with "invalid" below the link key. To re-enter the Link Key, click on the Link Key field and follow the procedure above.
SSP Debug Mode

If one of the Bluetooth devices is in SSP Debug Mode, the Wireless Protocol Suite software can automatically figure out the Link Key under certain conditions. To obtain the information for figuring out the Link Key, the software must actively observe the SSP pairing process in the capture. If the SSP pairing previously took place and encrypted data is later captured, the software does not have the necessary information to figure out the Link Key. The only alternatives are:
-
to again pair the devices in SSP Debug Mode, or
-
to independently determine the Link Key and enter it directly.
Only one device in the link must be in SSP Debug Mode.
If the Bluetooth devices do not allow Debug Mode activation, enter the Link Key as described above.
Bluetooth Low Energy Encryption and Decryption
Long Term Key
The Long Term Key (LTK) in Bluetooth Low Energy is similar to the Link Key in Classic Bluetooth. It is a persistent key that is stored in both devices and used to derive a fresh encryption key each time the devices go encrypted. In the analyzer’s Security pane the LTK is entered in the Link Key field so the following discussion will use Link Key instead of LTK.
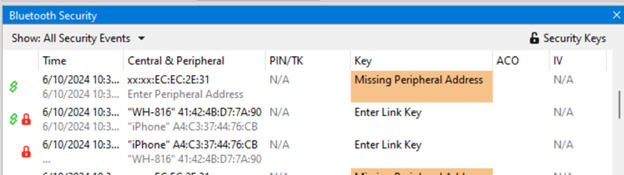
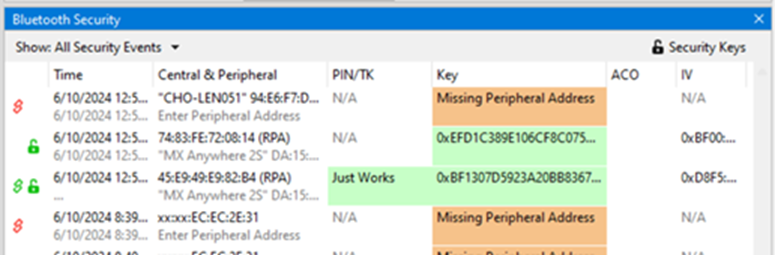
In this example a Low Energy device requires Link Key entry for the Wireless Protocol Suite software to decrypt the data. To enter the Link Key, click on Enter link key and type or paste in the Link Key in hex format.
It is not necessary to precede the Link Key with "0x" to signify a hex format. The software will automatically add "0x" to the front of the Link Key.
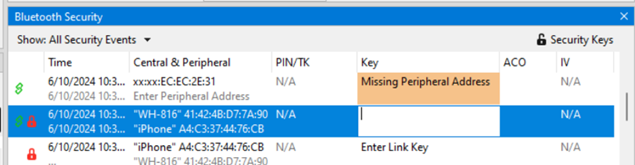
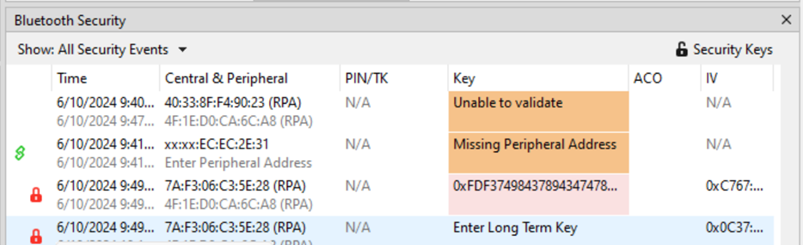
Press the Enter key or click outside the Link Key box. If the Link Key is valid the box will be green, beneath the Link Key will appear "Valid”, and the Status will show an open, green lock indicating that decryption is enabled.
If the Link Key is not valid the box will be red, beneath the entered Link Key will appear "Invalid", and the Status will show a closed, red lock indicating that decryption is not enabled.
Legacy “Just Works” Pairing
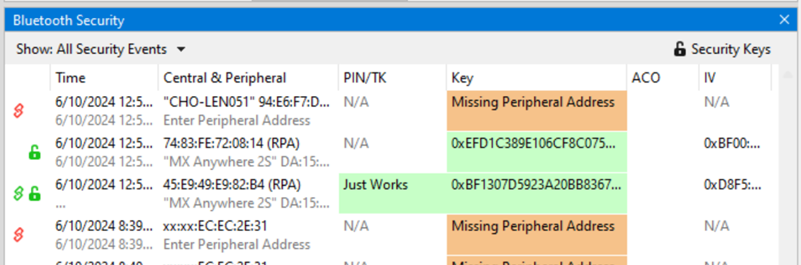
In this example the devices under test use Legacy “Just Works” pairing to calculate a Short-Term Key (STK) to securely transfer the device's Long-Term Key (LTK). The LTK is then used to encrypt the subsequent security contexts.
Legacy Passkey Pairing
PIN is a six-digit decimal number. If a passkey is required by the device "Enter passkey" will appear in the device's PIN/TK field.
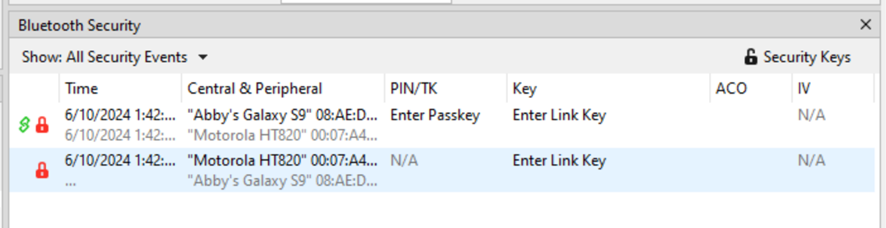
This example uses Passkey Pairing to enable decryption. The user clicks on "Enter passkey" in the device PIN/TK
field.
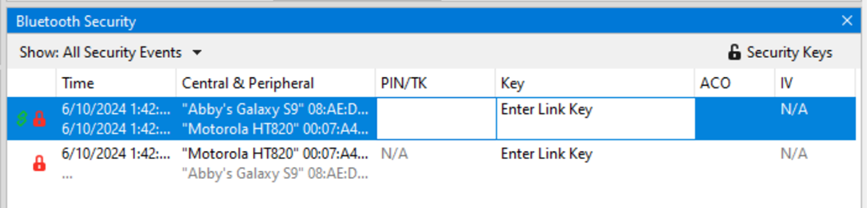
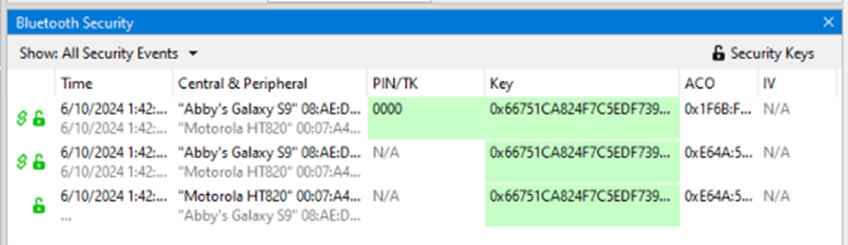
Press Enter or click outside the field. If the Passkey is correct it will appear in the PIN/TK field with "Valid" appearing below the passkey, the Link Key field will automatically fill with the Link Key that will show "Valid" and appear green. The Status field will show an open, green lock to show that encryption is enabled, and the analyzer can show decrypted data.
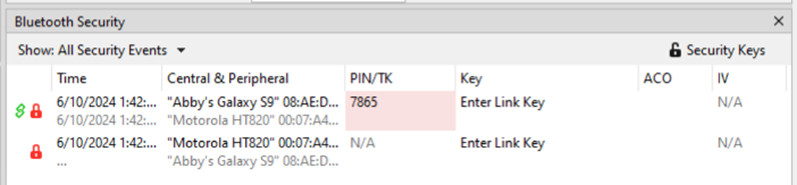
If the entered Passkey is incorrect, the PIN/TK field will be red and "Invalid" will appear below the entered PIN. The Status field will show a closed, red lock to indicate that encryption is not enabled.
Legacy Out-of-Band (OOB) Pairing
Out-of-Band (OOB) data is a 16-digit hexadecimal code preceded by "0x" which the devices exchange via a channel that is different than the LE transmission itself. This channel is called OOB. For off-the-shelf devices we cannot sniff OOB data, but in the lab, you may have access to the data exchanged through this channel.
If a device requires OOB data, the device Link Key field will show "Enter OOB TK".
Private Keys View
For captures that include Bluetooth Low Energy Secure Connections pairing between one or more pairs of devices, users will be able to manually enter Private Keys for both Legacy and Secure Connections. The Private/Public keys are stored for use by discovered Bluetooth Low Energy devices. Duplicate keys cannot be stored.
When Debug key is not used during pairing, the analyzer will look for a matching Public key in the set of Private/Public key pairs. If a match is found, the analyzer will use the corresponding Private Key to compute the Diffe-Hellman Key.
While operating in live mode, Private Keys are saved to persistent storage when the Wireless Protocol Suite window is closed. When the window is opened while in live mode, saved Private Keys are loaded from persistent storage.
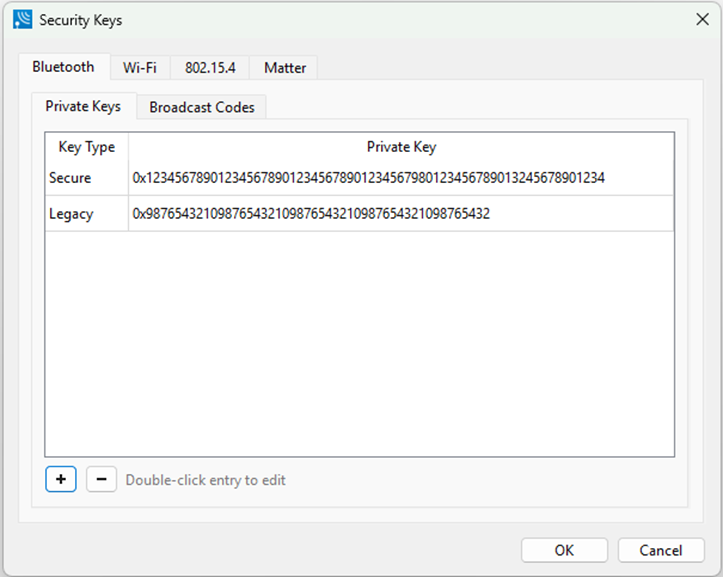
The Private Keys pane has two columns that list one entry for each unique key.
Private Keys Pane Columns
|
Column |
Description |
|
Key Type |
P192 if the key is used for Legacy pairing. P256 if the key is used for Secure Connection pairing. |
|
Private Key |
The key entered by the user. 24 octets for P192 (Legacy) 32 octets for P256 (Secure Connection) |
Private Key Management Tools
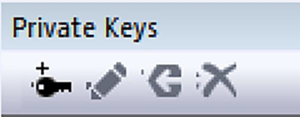
In the header of the Private Keys pane is a toolbar for adding or deleting keys.
Private Keys Management Tools
|
Tool |
Icon |
Description |
|
Add Private Key |

|
Used to add a Private Key to the pane. When clicked, it opens the Private Keys Entry dialog. See below. |
|
Edit Selected Private Key |

|
Enabled when a private key in the pane is selected. When clicked, it opens the Private Keys Entry dialog with the selected Private and Public Key filled in. See below. |
|
Reverse Private Key |

|
Enabled with a private key in the pane is selected. When checked, it allows the user to switch between big endian and little endian format. The public key will be updated to reflect the changes made to the private key. |
|
Remove Private Key |

|
Enabled when a private key in the pane is selected. When clicked the selected key row is removed from the pane. |
Right-clicking on a selected Private Key entry in the pane or right clicking anywhere in the pane will open a Private Key Management tools menu. The menu selections perform the same functions as the Private Key Management tools.
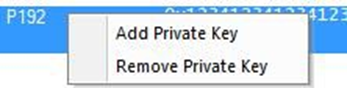
Private Key Entry dialog
The Private Key Entry dialog opens when the user selects Add Private Key from the Private Keys in Management Tools or from the right-click menu.
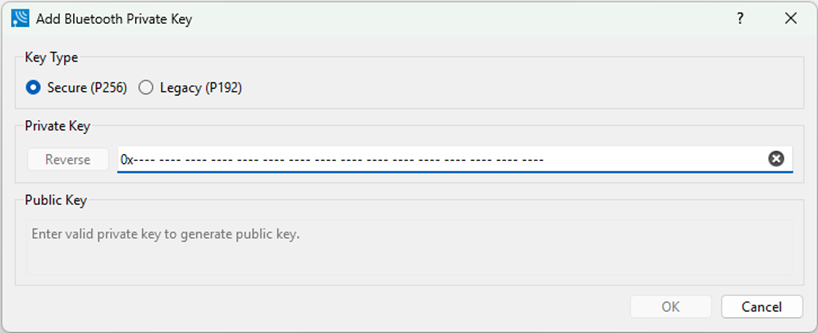
Private Key Entry Dialog Fields
|
Section |
Field |
Description |
|
Key Type |
P256 (Secure Connection) |
Make this selection if using Secure Connection pairing. |
|
P192 (Legacy Connection) |
Make this selection if using Legacy pairing. |
|
|
Private Key |
|
Enter the Private Key in hex. The size of this field will vary with the Key Type, P256 or P196. |
|
Allows the user to switch the Private Key between little endian and big-endian format. The public key will be updated to reflect the changes made to the private key. |
|
|
Public Key |
X: |
The Public Key is calculated automatically when the Private Key is completely entered. X: - first half of the key. |
|
Y: |
The Public Key is calculated automatically when the Private Key is completely entered. Y: - second half of the key. |
To Add a Private Key: click the Add Key button at the bottom of the pane.
-
Click the Add Key button at the bottom of the pane.

-
Select one of the following connection types to set the length of the Private Key field:
a. Secure Connection (P256), or
b. Legacy Connection (P192)
-
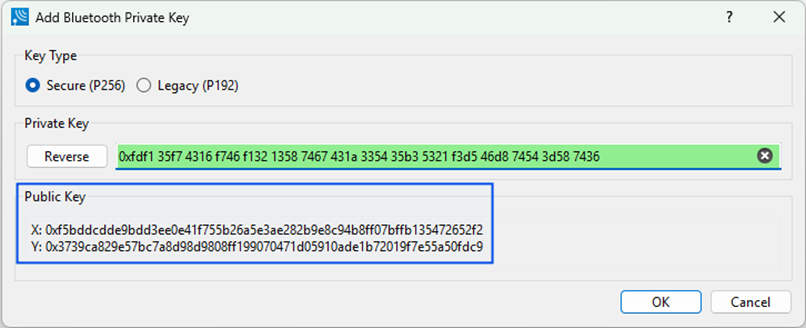
Enter the Private Key, in hexadecimal, into the Private Key field.
a. Secure Connection (P256) field type takes 64 hexadecimal characters.
b. Legacy Connection (P192) field type takes 48 hexadecimal characters.
If after entering the private key you change the Key Type from P256 to P192, the Private and Public key fields will truncate to the correct length for P192 key type. However, this does not work in the reverse direction.
The Private Key may also be pasted in. The copied key pasted in may have been in either big-endian or little-endian format. The Reverse button allows the user to reverse the format for use with their device.
-
Once the Private Key field is filled, the Public Key X: and Y: fields are automatically calculated and filled in.
-
Click the OK button, the dialog will close, and the added Private Key appears in the Private Keys pane.
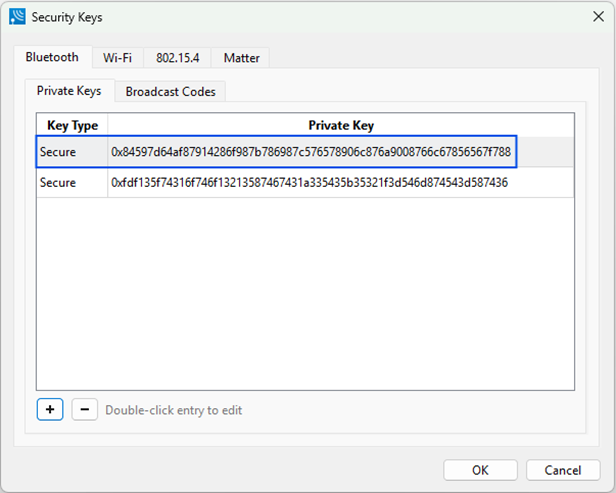
If the key entered already matches a key in the local storage, a dialog will be displayed indicating the issue and the window will not close.
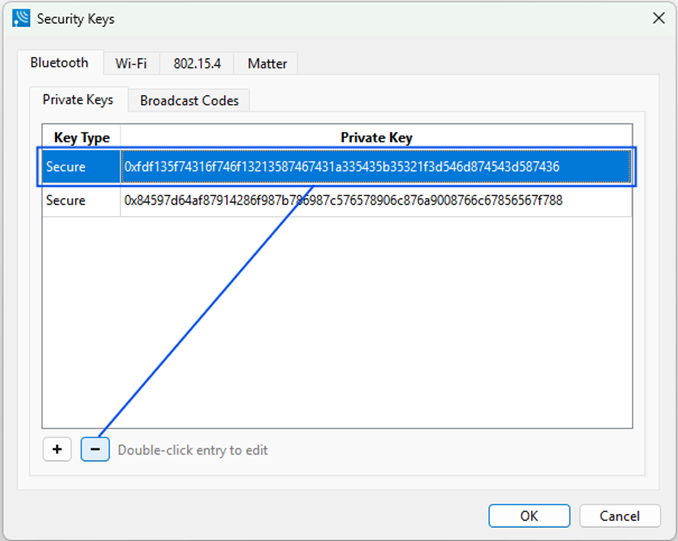
To Remove a Private Key, select the Private Key to be removed by clicking on the key in the Private Keys pane.
-
Click the Remove Key button at the bottom of the pane.
-
The key is removed from the list.
Bluetooth Privacy Codes View
For captures that include encrypted Broadcast Isochronous Streams, the Bluetooth Privacy Code used to decrypt the packets in the streams can be entered on the Bluetooth Privacy Codes View. The Bluetooth Privacy Codes View can be viewed or hidden from the View menu and can be docked like the other optionally viewable panes. While operating in live mode, Bluetooth Privacy Codes are saved to persistent storage when the Wireless Protocol Suite window is closed. When the window is opened while in live mode, saved Bluetooth Privacy Codes are loaded from persistent storage.
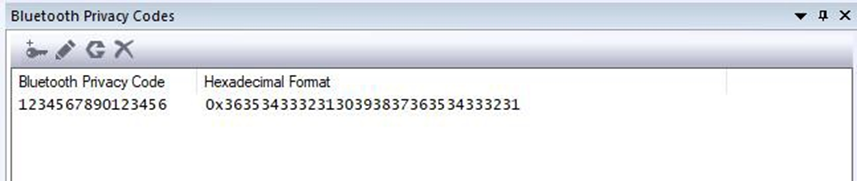
The Bluetooth Privacy Codes View has two columns that list one entry for each privacy code. Currently, only one code can be entered.
Bluetooth Privacy Codes View Columns
|
Column |
Description |
|
Bluetooth Privacy Code |
UTF-8-character representation of the code |
|
Hexadecimal Format |
Hexadecimal representation of the code |
The Bluetooth Privacy Code can be between 4 and 16 octets and represented as UTF-8 characters and in hexadecimal format.
Bluetooth Privacy Code management tools
In the header of the Bluetooth Privacy Codes View is a toolbar for adding or deleting codes.
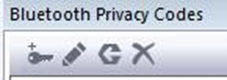
Bluetooth Privacy Codes Management Tools
|
Tool |
Icon |
Description |
|
Add Bluetooth Privacy Code |

|
Used to add a Bluetooth Privacy Code to the View. When checked, it opens the Add Bluetooth Privacy Code dialog. See Add Bluetooth Privacy Code dialog below. Currently only one Bluetooth Privacy Code can be entered. To add a new code, select the current code and remove it. The Add button will become active and a new code can be entered. |
|
Edit Selected Bluetooth Privacy Code |

|
Enabled when a Bluetooth Privacy Code in the View is selected. When clicked, it opens the Add Bluetooth Privacy Code dialog with the selected Bluetooth Privacy Code and hexadecimal filled in. See Add Bluetooth Privacy dialog below. |
|
Reverse Selected Bluetooth Privacy Code |

|
Enabled when a Bluetooth Privacy Code in the View is selected. When checked, it reverses the content of the code. (EX: A-BCDE becomes EDCB-A when reversed.) Both fields of the selected code in the View are updated to reflect the change. |
|
Remove Bluetooth Privacy Code |

|
Enabled when a Bluetooth Privacy Code in the View is selected. When checked, the selected code row is removed from the View. |
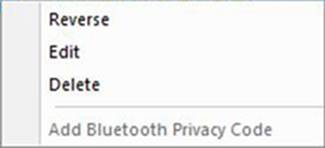
Right Clicking on a selected Bluetooth Privacy Code entry in the View or right clicking anywhere in the View will open a Bluetooth Privacy Code management tools menu. The Menu selections perform the same functions as the Bluetooth Privacy Code Management Tools.
Add Bluetooth Privacy Code Dialog
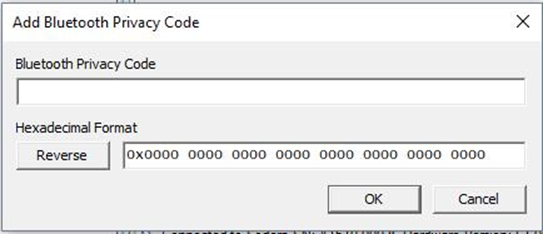
Add Bluetooth Privacy Code Dialog Fields
|
Section |
Field |
Description |
|
Bluetooth Privacy Code |
Bluetooth Privacy Code |
Enter the Bluetooth Privacy Code in text. |
|
Hexadecimal Format |
|
Enter the Bluetooth Privacy Code in hexadecimal. |
|
Allows the user to reverse the Bluetooth Privacy Code (ex: A-BCDE becomes EDCB-A when reversed.) Both fields will be updated to reflect the changes. |
To Add a Bluetooth Privacy Code 
-
If a Bluetooth Privacy Code already exists, select it and click the Remove

-
Click the Add
-
Enter the Bluetooth Privacy Code in either the Bluetooth Privacy Code field or the Hexadecimal Format field of the Add Bluetooth Privacy Code dialog.
-
Click the OK button, the dialog will close, and the added code will appear in the Bluetooth Privacy Codes View.
To Remove a Bluetooth Privacy Code
-
Select a Bluetooth Privacy Code row in the Bluetooth Privacy Codes View.
-
Click the Remove
-
The Bluetooth Privacy Code will be removed from the Bluetooth Privacy Codes View.
To Edit a Bluetooth Privacy Code 
-
On the Bluetooth Privacy Codes View, click on either of the following:
-
The selected entry in the Bluetooth Privacy Code field.
-
The selected entry in the Hexadecimal Format field.
-
Edit the field selected.
-
Press the keyboard Enter key or click the mouse pointer anywhere outside the edited row of the Bluetooth Privacy Codes View.
To in-place Edit a Bluetooth Privacy Code:
-
Click either on the Bluetooth Privacy Code field of the selected entry in the Bluetooth Privacy Codes View.
-
Edit the selected field.
-
Press the Enter key on the keyboard or click the mouse anywhere outside of the edited row of the Bluetooth Privacy Codes View. To Reverse

-
Select a Bluetooth Privacy Code in the Bluetooth Privacy Codes View.
-
Click the Reverse

-
The content of the selected Bluetooth Privacy Code is reversed. For example, code A-BCDE becomes EDCB-A when reversed.