
The SierraNet Analyzer front LCD display indicates the configuration and status of the device. For example, during initialization, the LCD panel displays boot status messages.
LCD Display and Button Functions for Analyzer Host Connection Setup
The host connection settings of the SierraNet can be configured from the unit itself. Five buttons are provided to navigate menus and input settings presented on the LCD display. When you first turn on the Analyzer, after initialization, the LCD displays SierraNet M1288/M648/T328/M328Q/ M328/M408/M168 Available with two arrows pointing up and down as shown in the illustration below.
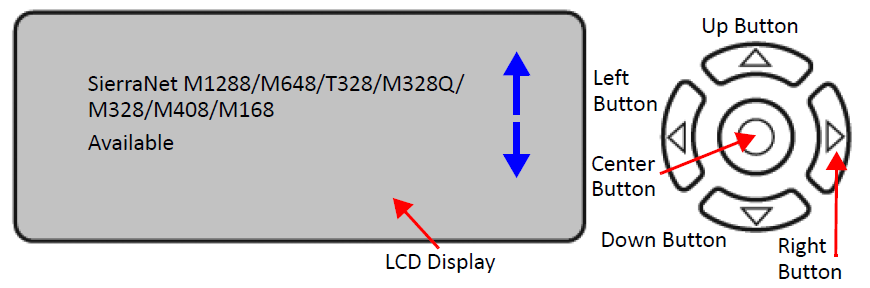
Press the Up 🔼 and Down 🔽 buttons to navigate through the following menu items:
-
Display current Static or Dynamic IP Address
-
SierraNet M1288/M648/T328/M328Q/M328/M408/M168 SN (serial number)
-
Connection
-
Unit Name
-
Set IP Configuration
-
IP Mode Dynamic
-
IP Mode Static
The Left ⬅️ and Right ➡️ buttons are used to change the configuration properties.
The LCD displays Button Inactive In This Menu Item if the button does not serve any purpose for that selection.
See the sections below for instructions on setting the IP Configuration and Static on Dynamic IP using the buttons and the LCD display on the analyzer.
Set IP Configuration
-
Power on the analyzer. The unit begins initialization.
-
Once the analyzer has finished initializing, press Down 🔽 button to scroll through the LCD menu:
Main menu > IP Address > Available (Unit not in use by other user)
-
Press the Down 🔽 button again to scroll through the other menus:
-
Main Menu > Product Name > Serial Number
-
Main Menu > IP Mode > Dynamic: The display shows the current IP Configuration mode of your product—Dynamic or Static.
-
Main Menu > Set IP Configuration: Change the IP Configuration from Dynamic to Static or from Static to Dynamic
-
Main menu > IP Address > Available (Unit not in use by other user)
-
NOTE: If Main Menu > IP Address > ENET Connected comes up when you are using the Down 🔽 button to scroll through the menus, this means a user has already connected the unit to the network. You can bump the unit off the network by pressing the Right button and resetting the IP address as explained in Changing from Dynamic to Static IP Mode, below.
Changing from Dynamic to Static IP Mode
If the Analyzer is in Dynamic IP Mode, perform the following steps to change it to Static IP Mode and manually set a Static IP Address:
-
After initialization, press the Down 🔽 button to ensure your unit is in Dynamic IP Mode.
-
Press the Down 🔽 button until you see Set IP Configuration.
-
Press the Center

-
Press the Center
-
Press the Center

-
Use the Up ⬆️ or Down 🔽 button to change the IP Address.
-
Press the Right ➡️ or ⬅️ Left button to move to the right or left to change each component of the static or dynamic IP address and change it using Step 6.
-
Once the IP Address is selected, press the Center

-
The new Static IP Address displays.
-
Press the Up ⬆️ button once. Accept and Reboot displays.
-
Press the Center

-
If you want the new Static IP Address to be stored and your unit to Reboot, press the Center

-
After Rebooting has completed, to check that you are in Static IP Mode, use the Down 🔽 button to scroll through the Main menu.
Changing from Static to Dynamic IP Mode
If your unit is in Static IP Mode you can change it to Dynamic IP Mode, the IP Address will be set automatically by the network using DHCP. To change from a Static IP address to a Dynamic IP address, follow the steps below:
-
Ensure your unit is in Static IP Mode by scrolling through the menus displayed on the LCD by pressing the down button. Main Menu > IP Mode > Static.
-
Press the Down 🔽 button one more time and Set IP Configuration should be displayed.
-
Press the Center
-
Press the Center
-
Accept and Reboot displays. Press the Center
-
If you want the new Dynamic IP Address to be stored and your unit to Reboot, press the Center
-
To check that you are in Dynamic IP Mode, use the Down 🔽 button to scroll through the Main menu.
Note: If the device is often moved from one subnet to the other, it is recommended to set the IP Mode to Dynamic and to configure the DHCP server so that the device always receives the same (known) IP address. Many DHCP servers allow this type of static allocation based on the device MAC address.
Setting the Gateway and Subnet Mask
Note: Setting the Gateway and Subnet Mask require a detailed knowledge of your network.
-
Ensure that you are in Static IP Mode by following the steps in Set IP Configuration and Changing from Dynamic to Static IP Mode, if necessary.
-
Press the Down 🔽 button to get to the Set IP Configuration menu.
-
Press the Center

-
Press the Center
-
To set the Subnet Mask, Press the Center
-
Use the Up 🔼 or Down 🔽 button to change the Subnet Mask.
-
Press the Right ➡️ or ⬅️ Left button to move to the right or left to change each component of the Subnet Mask and change it as described in Step 6.
-
Once the Subnet Mask is selected, press the Center
-
The press the Down 🔽 button to get to the Gateway Address menu.
-
To set the Gateway Address, press the Center
-
Use the Up 🔼 or Down 🔽 button to change the Gateway Address.
-
Press the Right ➡️ or ⬅️ Left button to move to the right or left to change each component of the Gateway Address and as described in.
-
Once the Gateway Address is selected, press the Center
-
Press the Up 🔼 button to confirm the Subnet Mask, then press the Up 🔼 button again to confirm the Static IP Address.
-
Press the Up 🔼 button one more time to display Accept and Reboot.
-
Press the Center
-
If you want the new Subnet Mask, Gateway Address, and Static IP Address to be stored and your unit to Reboot, press the Center