
USBTracer™, USB Advisor™, and Voyager™ USB Protocol Suite Automation can be run locally or remotely. This appendix describes how to configure Automation to run over a network. Automation uses Distributed Component Object Model (DCOM) to manage the transmission of automation commands over a network. When Automation is set up for remote usage, the Host Controller is configured as a DCOM server and the remote PC is configured as a DCOM client.
Running Automation Locally
If you intend to run Automation on the Host Controller (the PC attached to the Analyzer), you do not need to perform any special configuration. You can simply execute the scripts or programs you have created and they run the Analyzer.
Setting Up Automation for Remote Use
If you intend to run automation remotely over a network, you must perform DCOM configuration. These steps are described below:
-
Run the Microsoft™ utility dcomcnfg or dcom98 on the Host Controller and configure the Host Controller so that it can be controlled by another device. For Windows™ 2000 and NT 4.0, use dcomcnfg. For Windows 98, use dcom98. Dcom98 is not bundled with the operating system, so you must install it first.
-
Run dcomcnfg or dcom98 on the remote PC.
-
Using dcomcnfg or dcom98, configure the remote PC so that it activates the Host Controller by default.
-
Test your DCOM configuration by running a script file on the remote PC. Teledyne LeCroy provides some sample script files that you can use for this test.
-
If you write a program in C++, make sure that the Host Controller is registered on both the client and server machine.
DCOM Configuration for Host Controller
To configure DCOM on the Host Controller, you run a DCOM configuration utility called dcomcnfg. On Windows 2000 and Windows NT 4.0, DCOM and the dcomcnfg are bundled into the operating systems. On Windows 98, DCOM is not bundled into the operating system. You must first install DCOM before you can use dcomcnfg to configure the Analyzer for remote use.
When dcomcnfg is run, it presents a list of installed applications that support DCOM. To configure an application for DCOM, select an application from the list, then apply security and launch settings.
This appendix describes the process for configuring security and launch settings to the Analyzer for Windows 2000 and Windows NT 4.0 systems. If you are using Windows 98, you must first install DCOM before you can use dcomcnfg. The screens for Windows 98 are a little different from what you see in this appendix.
Summary of DCOM Server Configuration Steps
DCOM server configuration for the Host Controller involves three steps:
-
Configure DCOM Authentication to Default.
-
Configure DCOM launch permissions to Everyone.
-
Configure Run Identity with your login name.
Configuring When and How Authentication Should Occur
The dcomcnfg utility presents a number of security options. In the steps that follow, configure the Analyzer application on the Host Controller to authenticate the user when the user first attempts a connection.
-
Click the Windows Start button.
-
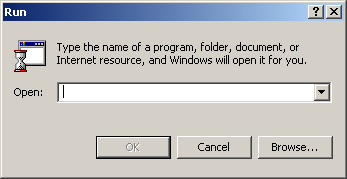
Select Run to open the Run dialog.
-
In the Open box, type dcomcnfg.
-
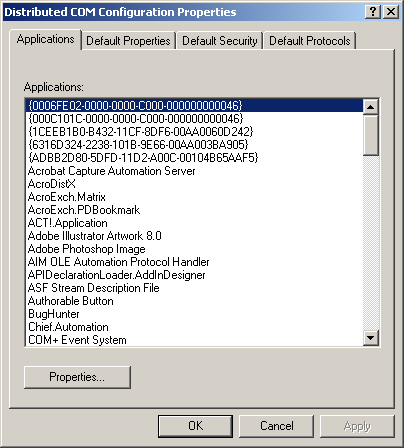
Click OK. The DCOM configuration dialog box opens.
-
In the Applications tab, scroll down the list of applications and select USBTracer/Trainer, USB Advisor, or Voyager (USB Protocol Suite).
-
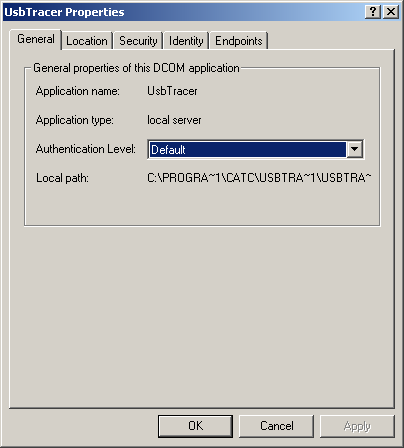
Click the Properties button. The Properties dialog box opens.
-
From the Authentication Level menu, select Default.
Configuring Access Permissions
Access permission determines who may execute commands on the application once it is running. In the following steps, you give everyone access to the application on the Host Controller.
-
With the Properties dialog box still displayed, select the Security tab.
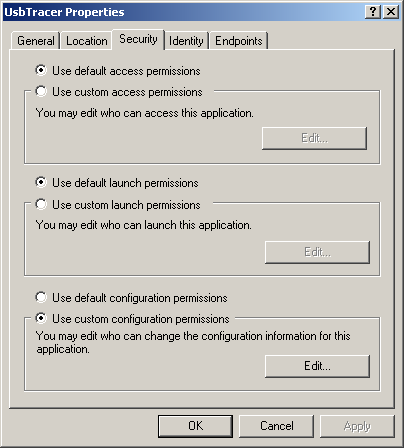
There are three categories of options. Each has a default and also can be customized:
-
Access Permissions: Determines who can execute commands on the application once it has been started.
-
Launch Permissions: Determines who can launch the application.
-
Configuration Permissions: Determines who can configure permissions for the application
-
Select User custom access permissions.
-
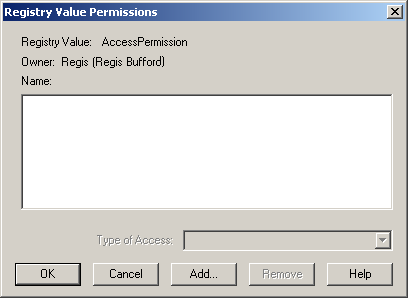
Click Edit. The Registry Value Permissions dialog box appears.
-
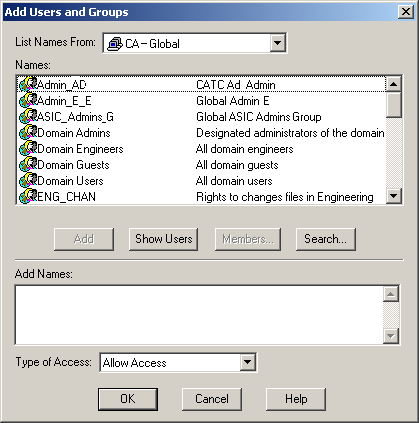
Click Add. The Add Users and Groups dialog box appears.
-
Select the group called Everyone.
-
Click Add.
-
Select the group System.
-
Click Add.
-
Click OK. The Add Users dialog box closes.
10. Click OK. The Add Users and Groups dialog box closes.
11. Click OK. The Registry Key Permissions dialog box closes.
Configuring Launch Permissions
Launch Permissions control who can start an application. To give everyone permission to launch the application on the Host Controller:
-
In the Security tab of the server Properties dialog box, select Custom Launch Permissions.
-
Click Edit. The Registry Value Permissions dialog box opens.
-
Click Add. The Add Users and Groups dialog opens.
-
Select the group called Everyone. You also can choose to add individual user accounts.
-
Click Add.
-
Click OK. The Add Users and Groups dialog box closes.
-
Click OK. The Registry Key Permissions dialog box closes.
Configuring Configuration Permissions
To give everyone permission to configure permissions for the application on the Host Controller:
-
In the Security tab of the server Properties dialog box, select the option User Custom Configuration Permissions.
-
Click Edit. The Registry Value Permissions dialog box appears.
-
Click Add. The Add Users and Groups dialog appears.
-
Select the group called Everyone. You also can choose to add individual user accounts.
-
Click Add.
-
Click OK. The Add Users and Groups dialog box closes.
-
Click OK. The Registry Key Permissions dialog box closes.
Set User Run Permissions for Host Controller
If you want to create password-based security for individual users, perform the following steps on the Host Controller:
-
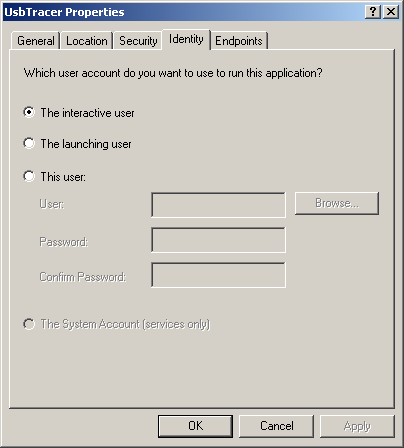
From the Properties dialog box, select the Identity tab.
-
Select The Interactive User.
DCOM Client Configuration
DCOM client configuration is a four-step process:
-
Set authentication to occur upon connection with the Host Controller.
-
Set the Host name or IP address of the server to which the client will connect.
-
Set commands to run on the Host Controller.
-
Set the network protocol over which DCOM will run.
Setting When and How Authentication Should Occur
You specify when and how the client should be authenticated by performing the following steps:
-
Click Start.
-
Select Run.
-
In the Open bo, type dcomcnfg.
-
Click OK.
-
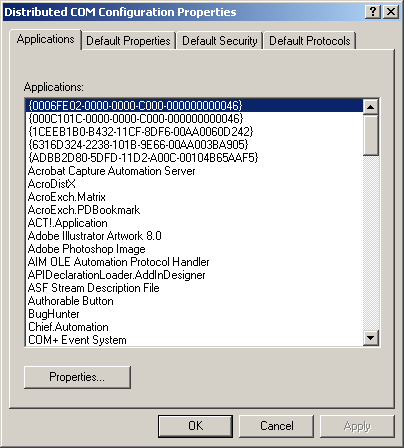
Select USBTracer/Trainer, USB Advisor, or Voyager (USB Protocol Suite) from the list of applications.
-
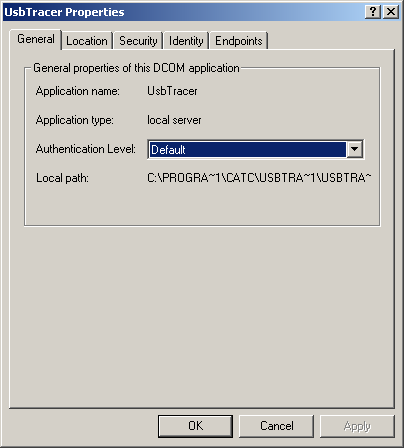
Click Properties.
-
Click the Authentication drop-down menu and select Default. This tells the client to connect to the Host Controller using the Host Controller’s Authentication Level.
Set the Host Name or IP Address of the Host Controller
You must identify the device upon which the client will execute its commands.
Note: If you are writing a C/C++ program for automation, you can skip the following steps because you will specify the remote machines programmatically.
-
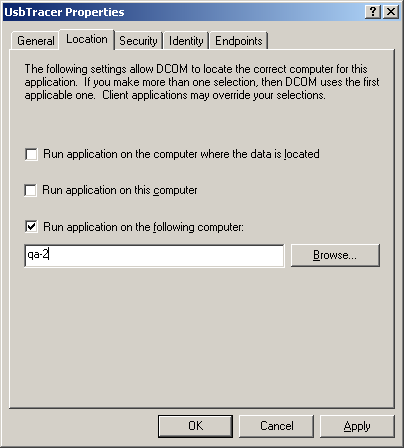
From the Properties dialog box, select the Location tab.
-
Select the option Run application on the following computer.
-
In the text box below the selected option, enter the Host Name or IP address of the Host Controller. Click Browse to search for the address if you don’t know it.
-
Click OK. The Properties dialog box closes. You see the Distributed COM Configuration Properties dialog box.
Set The Analyzer Commands to Execute on the Host Controller
The last configuration step is to set the "launch" location to Server for commands. This setting tells the client to execute commands remotely on the DCOM server rather than on itself.
-
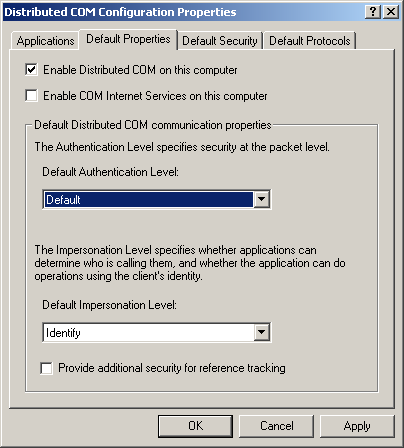
On the Distributed Configuration Properties dialog box, click the tab marked Default Properties. You should see the following settings. If the settings are not the same as those shown, change them to match the screenshot.
-
Select Enable Distributed COM on this computer.
You must perform this step on both the DCOM server and DCOM client.
Set the Default Network Protocol
-
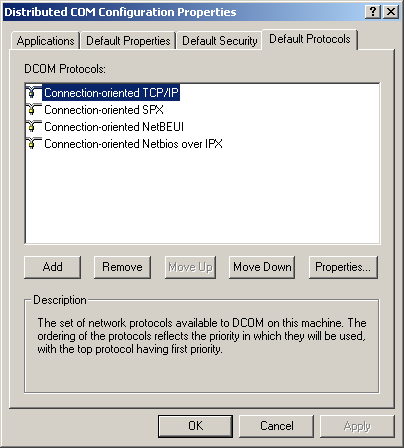
In the Distributed COM Configuration Properties dialog box, select the Default Protocols tab. The following screen displays. TCP/IP should appear at the top of the list. If it does not, use the Move Up button to move it to the top of the list. If the protocol does not appear at all, you must add it.
-
Click OK to close the Distributed COM Configuration Properties dialog box. Your PC is now configured to run USBTracer/Trainer, USB Advisor, and Voyager USB Protocol Suite Automation.
Samples for Automation
You can test your Automation setup by running a sample script file or executing one of the simple client applications included in the software installation in the following path (typical installation):
C:\Users\Public\Documents\LeCroy\USB Protocol Suite\Automation
The folder contains 4 directories:
cpp: Contains C++ source code files. This directory includes the source code for an application called analyzerclient.exe. Analyzerclient.exe is a simple interface to the Automation API. Analyzerclient.exe lets you manage the Analyzer.
cpp_command_line: Similar to the cpp folder, but implements from the command line instead of a GUI.
html: Contains a directory with an HTML-based client application called analyzer1.html that is a simple interface to the Automation API.
wsh: Contains Visual Basic script files. You can run these script files by double-clicking on them.
To test your Automation setup, execute AnalyzerClient.exe (after compiling it first) or analzyer1.html, or double-click one of the wsh files. If your setup is correct, execute a Teledyne LeCroy sample script on the client PC that connects to the Host Controller. Sample script files can be found in the Automation folder mentioned above.
Testing Your Automation Setup with AnalyzerClient.exe
The following steps show you how to test your automation setup using AnalyzerClient.exe. As mentioned above, you must compile this first from the source code in the cpp directory.
In the steps below, you execute analyzerclient.exe on a remote PC and establish a connection with the Host Controller PC. Then, you remotely load a trace file on the Host Controller.
-
Browse to the directory in which you compiled AnalyzerClient.exe.
-
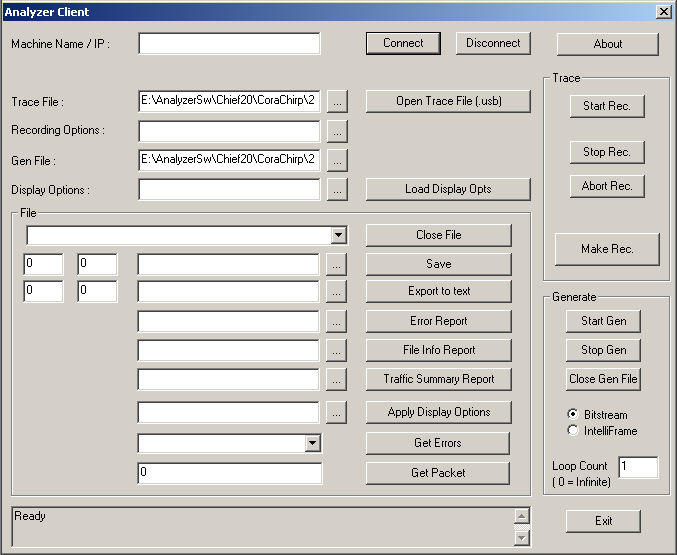
Double-click AnalyzerClient.exe. The application starts. You also can copy the executable to your hard drive and launch it from there.
-
Enter the IP address or Host Name of the Host Controller.
-
Click Connect.
The status message at the bottom of the window should change from Ready to a message that reads something like USBTracer: Version 1.70. This change indicates that a connection has been established to the Host Controller.
When you have completed this step, the Interface software automatically launches on the Host Controller.
If the message "The RPC server is unavailable" appears, check the network connections between the two PCs. Also try using the IP address in place of the Host Name (assuming that you had originally used the Host Name).
If the message "Access denied" appears, make sure that the account that you are using on the Host Controller is the same as the one you are using on the client PC and that both have Administrator privileges.
-
Click the Browse button next to the Trace File text box to browse for a trace file. If you are going to run the commands over a network, you must supply the network path.
-
Browse for a trace file of your choice. If you do not have a trace file on your PC, you can select one from an Installation diskette. When you have selected a file, its name should appear in the Trace File text box.
-
Press the button marked Open File. A message should appear at the bottom of the window listing the trace name, file size (in packets) and trigger position.