
Connect the DUT to the Exerciser
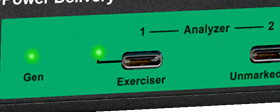
Use the port labeled Exerciser to connect the DUT to the PD Exerciser. This port is the same as the left Analyzer port on Voyager M310C, but in other platforms is an independent port.
The PD exerciser also requires specific cable orientation. You will see a red LED if the cables are connected incorrectly. For the Voyager M310P platform, the cable orientation does not matter.
Enable the PD Trainer
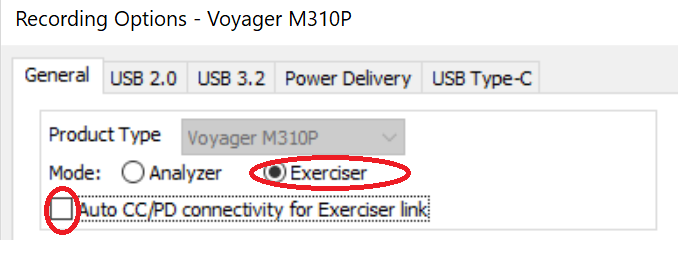
To enable the PD Trainer/Exerciser, set the working mode to Exerciser in the general tab of Recording Options. Make sure the Auto CC/PD connectivity checkbox is cleared.
If you need to source more than 5V of power, clear the Allow Vbus > 5V checkbox in the Recording Options > Power Delivery tab.

Warning! Allow VBUS > 5v is a safety feature that prevents sourcing above 5V. When enabled, this mode allows voltage levels to be delivered to the DUT that might exceed their current carrying capabilities. While the Voyager system is designed to tolerate higher current, these higher voltages might inadvertently cause damage to devices/cables under test.
To set the Connected Device Name, go to Recording Options > General and add alias labels for your DUTs.
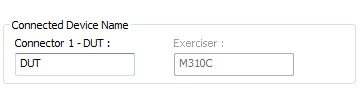
These labels will appear in the trace capture.

The alias name is primarily for use in analyzer mode and requires that device names are added before recording traffic. The device naming can also be used in Exerciser mode; however, message frames from the Exerciser will always be labeled with the Voyager model.
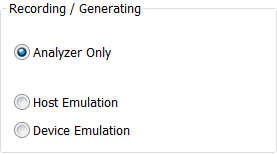
In USB 3.1 tab, Recording/Generating option, leave in Analyzer Only mode unless you also want to run 3.1 traffic.
Use the example PD Exerciser scripts to begin testing:
C:\Users\Public\Documents\LeCroy\USB Protocol Suite\Examples\Power Delivery Exerciser
|
Example Script |
Behavior |
|
Source Power Negotiate VDM.updg |
Voyager as Source negotiates default Provider [email protected], then sends Discover-Id using Basic Commands. |
|
High Level Negotiate with dynamic change cap.updg |
Voyager as Source negotiates default Provider 1A@5V, then broadcasts lower PDO [email protected] and re-negotiates using High Level Commands. |
|
Discover Cable.updg |
Voyager as Source programmatically turns on VCONN and performs the Discovery Process for cables using High Level Commands. |
|
Sink Power Negotiate.updg |
Voyager as Sink Waits to receive Source cap, then negotiates as Sink - 900mA@5V using Basic Commands. |
|
Apple VGA multiple Adaptor.updg |
Voyager as Source enables VCONN and Sends Discover Id; Discover Mode for Apple SVID (0x05AC); Enter Mode (PD_DISPLAY_PORT_SVID) then Exit Mode; turns off VCONN. This process uses Basic Commands. |
|
High Level Device Discovery.updg |
Voyager as Source sends Discover Id; Discover SVIDs; Discover Modes for Display Port SVID (0xFF01); Enter Mode (0xFF01); Exit Mode (0xFF01); Discover Modes for Apple SVID (0x05AC); Enter Mode(0x5AC mode 1); Exit Mode(0x5AC mode 1); Enter Mode(0x5AC mode 2); Exit Mode(0x5AC mode 2). This process uses High Level Commands. |
|
NegotiationSample_WithSwapPowerRole.updg |
Voyager as Source sends SwapPowerRole and negotiates as a Sink after power role swap. 1.5A@5V. This process uses High Level Commands. |
|
Sink Auto Response.updg |
Voyager as Sink responds to all incoming PD messages within 100s using the Auto Response Command. |
Run a Sample Script
Connect a cable to the Exerciser port.
Click Record, wait a few seconds, then click Run. The PD Exerciser uses the sequence below at the beginning of each example script to simulate a re-connect event.
call PD_Disconnect()
call PD_SetResistorRp( PD_ON, CC_RP_CUR_1_5, CC_LINE_1 )
call PD_SetVBus( PD_ON )
Note: It’s also possible to execute the example scripts before the cable is connected to Exerciser by performing “hot plug” (some issues may be seen with some devices not responding to the exerciser in this case).
Note: Some latency may be observed when activating/downloading PD exerciser scripts (Run button) This will be improved in a future release.
Licensing Note
Operating the PD Exerciser beta requires the USB Power Delivery Exerciser option to be enabled on the Voyager base unit:
|
USB Power Delivery - Type C |
Yes |
USB Power Delivery Analysis - Type C |
|
USB Power Delivery - Exerciser |
Yes |
USB Power Delivery Exerciser |
Power Delivery with EPR
In this document, exerciser commands and modes designated for PD with EPR (as both PD Source and PD Sink) are only supported on certain EPR capable Voyager platforms. Using these commands/modes with other platforms may lead to compilation errors and scripts that do not complete.
In PD Source mode, if capacity in the extended range (EPR) is required (voltage > 20V), a compatible programmable power supply must be connected through the EPR power/control interface on the rear of the analyzer.
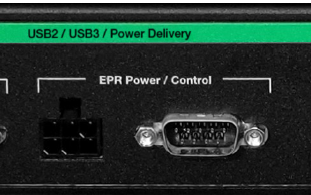
The following power supplies are currently supported:
-
B&K Precision 9202/B
-
B&K Precision 9205/B
-
B&K Precision 9206/B
The USB Protocol Suite software integrates seamlessly with the power supply, so there’s no need for any additional programming. Define the PD Source capabilities using the commands found in this document, and everything will be configured automatically.